Whatsapp:
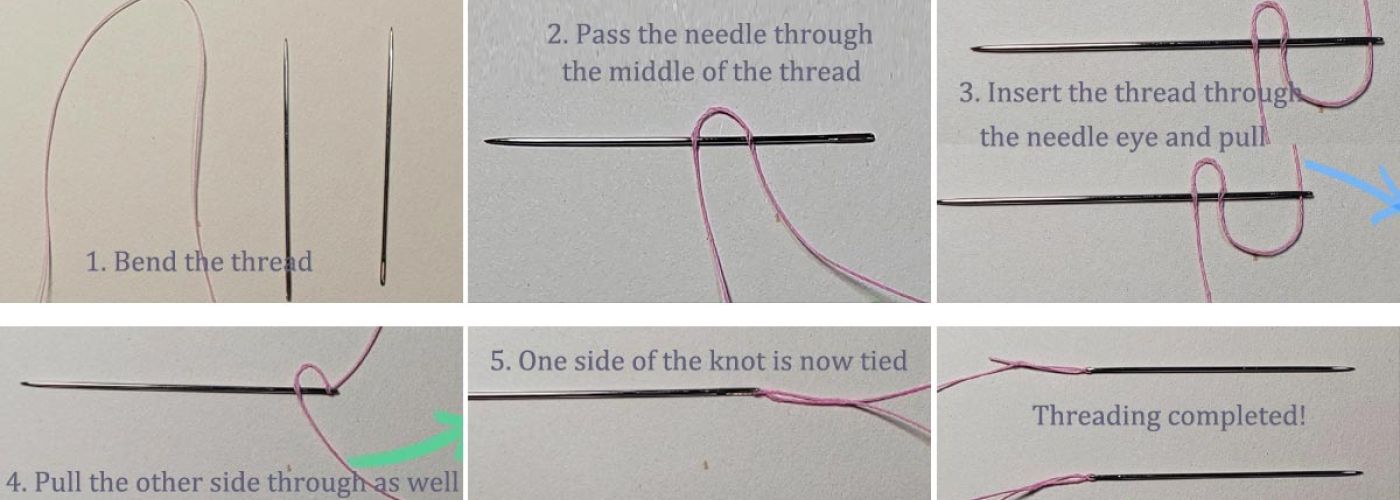
How To Thread Leather Needle
Learning how to thread a leather needle is an essential skill for anyone working with leather — whether you’re repairing a bag, making a wallet, or creating custom leather goods. This article is a step-by-step tutorial to help you master the basics. We hope this tutorial will be helpful for you as you get started.
In this guide, guys, you’ll learn how to properly thread a leather threading needle in five easy steps — with pro tips from MH Thread, a global supplier of professional leather sewing threads.
Introduction to Leather Stitching
Leather stitching is at the heart of every successful leatherworking project, whether you’re crafting a sturdy belt or a stylish pouch. The most popular hand stitching technique is the saddle stitch, prized for its strength and durability. This method uses thread locks at every stitch, so if the thread ever breaks, only a single stitch will come undone—unlike machine stitching, which can unravel much more. Before you start, it’s important to learn the basics: how to thread a leather needle, select the right thread, and create clean stitching holes. If you’re new to leather, begin with a simple project like a belt or a small pouch to practice your stitching and threading skills. With patience and the right approach, you’ll soon master the essential points of leather sewing and create projects you can be proud of.
What You’ll Need
Before starting, prepare the following materials:
-
Leather sewing needle (blunt tip or diamond-point)
-
Waxed polyester or bonded nylon thread
-
Scissors
-
Beeswax (optional, for smoother threading)
-
A piece of scrap leather to test your setup
A photo of the materials laid out can be helpful as a reference for your setup.
MH Thread recommends using waxed polyester thread for hand sewing leather — strong, flexible, and easy to thread without fraying.
Choosing the Right Leather Needle
Selecting the right leather needle is key to achieving strong, even stitches in your leatherwork. Leather needles are specially designed to pierce thick, tough material without damaging it, and they come in a range of sizes and shapes. For example, thicker leather requires a larger, sturdier needle, while thinner leather is best paired with a finer needle for more delicate stitching. The type of thread you use also matters—some threads work better with certain needle types, so always match your needle and thread to your project. Look for needles with a large enough eye to accommodate your chosen thread, and make sure the needle is sharp enough to push through the leather without excessive force. Using the correct needle will help you create neat, consistent stitches and make the job much easier, especially when working with thick or dense leather.
Step 1: Cut the Thread at an Angle
Cut about 60–80 cm (24–30 inches) of thread (about half the length of your arm) — enough for your project but not so long that it tangles. When threading the needle, leave at least an inch of thread past the eye to make sewing and knotting easier.
Trim one end at a sharp angle to make it easier to insert through the needle’s eye. If your thread is frayed or fuzzy, re-cut it cleanly.
???? Tip: Coating the end lightly with wax can help stiffen the fibers for easier threading. Rest assured, the rest of the threading process is straightforward.
Step 2: Insert the Thread into the Eye of the Needle
Take your leather sewing needle and insert the cut end of the thread through the eye. Use your thumb to guide the thread as you slide it through the eye for better control.
Leather needles often have a larger, elongated eye, designed to fit thicker thread. Slide the thread past the eye of the needle.
If your thread struggles to pass through, slightly twist it between your fingers to tighten the fibers — this keeps it smooth and compact. After inserting the thread, make sure to place it properly in the right place within the needle's eye to ensure secure stitching.
Finally, straighten the thread after threading to make sure it pulls smoothly.
Step 3: Pull Through and Lock the Thread
Once the thread is through the eye, pull about 3–4 cm (1–1.5 inches) past the needle. Passing the thread through the small hole of the needle can be tricky, so make sure the thread is secure at the hole to prevent shredding or unraveling. Now, pierce the thread’s tail back into the main thread (around 3–5 cm away from the end), making sure to pierce between the strands of the thread to create a small loop lock. Piercing between the strands helps secure the thread in place and improves durability.
If you are using two needles, you may need to repeat this process at the other end or on the other side of the thread.
This technique prevents the thread from slipping out during stitching — an essential trick for hand sewing leather. For extra security, repeat the locking step to ensure the thread stays firmly in place.
Step 4: Double the Thread (Optional)
For most leather projects, artisans use a single thread with two needles (the “saddle stitch” method). But if you prefer extra durability — for belts, straps, or upholstery — you can double the thread through one needle, making sure to secure and prepare the working thread before stitching.
This provides a thicker, stronger seam, though it requires more effort when pulling through tough leather.
Step 5: Test on Scrap Leather
Before you begin your actual project, test your needle and thread for sewing leather on a scrap piece. Ensure:
-
The thread passes smoothly through the holes.
-
No fraying occurs at the eye.
-
The waxed coating helps glide easily through the material.
If you noticed a bit of resistance or fraying during this test, it may indicate that your setup needs adjustment—sometimes the bit of the needle or a tool attachment can affect the threading or tension.
Adjust tension or re-thread if necessary.
Tips for Working with Leather
Achieving professional results in leather stitching starts with careful preparation and the right materials. Always use high-quality leather and opt for a thicker thread, such as waxed thread, to ensure your stitching line is both strong and attractive. Before you begin stitching, cut your leather to the correct size and shape, and use a stitching chisel or awl to create evenly spaced stitching holes—this helps your stitches stay straight and uniform. Maintain a consistent stitch length and even tension as you sew to avoid puckering or uneven lines. When gluing edges, use only a small amount to prevent stiffening or damaging the leather. Regularly conditioning your leather will keep it soft and flexible, helping your finished project look and feel its best. These simple tips will help you create clean, durable stitches and a polished final product.
Troubleshooting Common Issues
Even experienced leatherworkers encounter challenges, but most issues can be fixed with a few adjustments. If your thread starts to shred or unravel, check that you’re using a thread designed for leather and that it’s securely locked to the needle with a proper knot or thread lock. Uneven stitching or inconsistent stitch length often results from varying tension—try using a stitch guide or marking your stitching line to keep things even. When working with especially thick leather, switch to a thicker needle or try a different stitch to make the process smoother. If you notice knots forming or the thread getting stuck, double-check that your thread is pulled tight and locked in place after each stitch. By identifying and addressing these common problems, you’ll be able to fix mistakes quickly and create strong, attractive stitches every time.
Recommended Needles and Thread for Sewing Leather
|
Project Type |
Recommended Needle |
Ideal Thread |
MH Product Suggestion |
|---|---|---|---|
|
Thin leather (wallets, straps) |
Glover’s or Harness Needle #4–#6 |
MH Waxed Polyester |
Smooth and easy for hand sewing |
|
Medium leather (bags, belts) |
Harness Needle #2–#4 |
MH Bonded Nylon |
Strong seams, professional finish |
|
Thick leather (upholstery, saddlery) |
Curved or Heavy-Duty Needle #0–#2 |
MH Bonded Polyester |
High strength and UV resistance |
For more tips on choosing the right needles and thread, check out our detailed post on the topic.
Maintaining Leather Stitching Tools
Keeping your leather stitching tools in top condition is essential for smooth, efficient work. After each project, clean your needles and store them in a dry, cool place to prevent rust or corrosion. Over time, leather needles can become dull, making it harder to push them through the leather—use a needle sharpener or fine-grit sandpaper to gently restore the point. Replace any needles that are bent or damaged to avoid uneven stitching. It’s also a good idea to use a thread conditioner to keep your thread soft, flexible, and less likely to break. By regularly maintaining your needles, thread, and other tools, you’ll ensure they last longer and perform at their best, making every leather stitching project easier and more enjoyable.
Why Choose MH Thread for Leather Stitching
-
Over 25 years of experience in thread manufacturing
-
10,000+ product varieties covering polyester, nylon, and waxed leather threads
-
Factory-direct prices and bulk customization (color, thickness, packaging)
-
Exported to 150+ countries and trusted by leather workshops worldwide
No matter what kind of needle and thread for sewing leather you need — from fine decorative work to industrial upholstery — MH Thread delivers the right strength, texture, and color.
Shop Leather Sewing Threads from MH Thread
Ready to start stitching?
Explore MH’s range of leather sewing threads, including waxed, bonded nylon, and polyester options — perfect for every leathercraft project.
???? Flexible bulk orders | ???? Pantone color customization | ???? Global delivery
???? Visit MH Thread Official Website and find the perfect thread for your leather needle today!